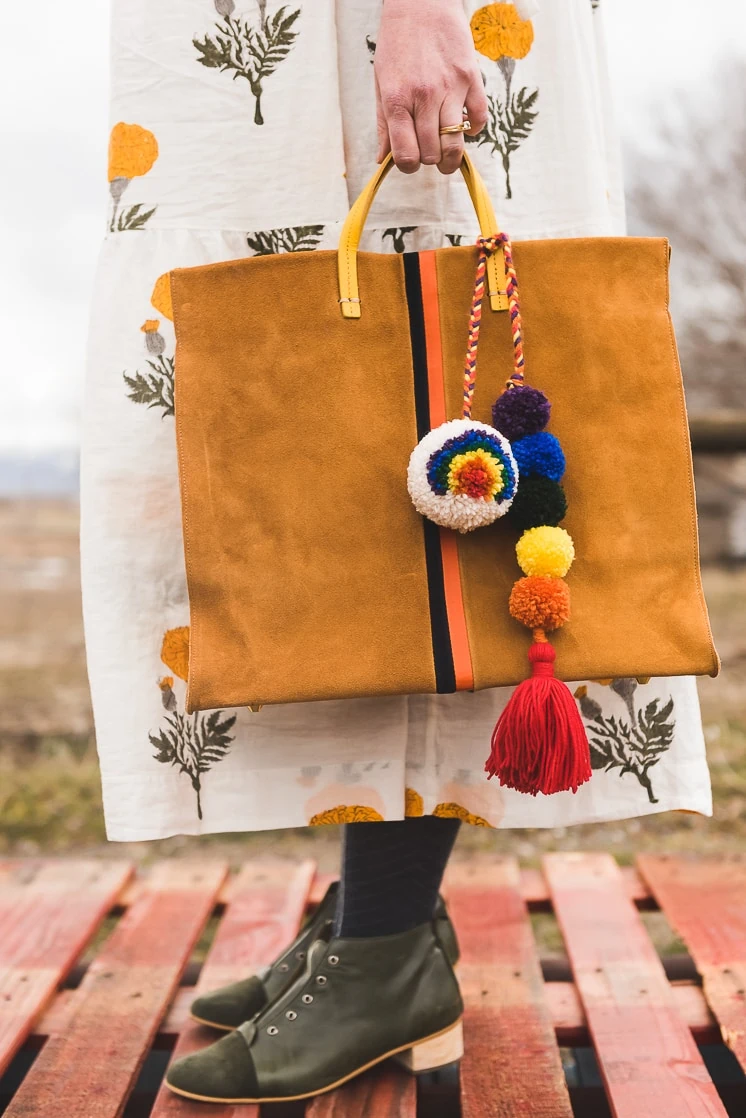
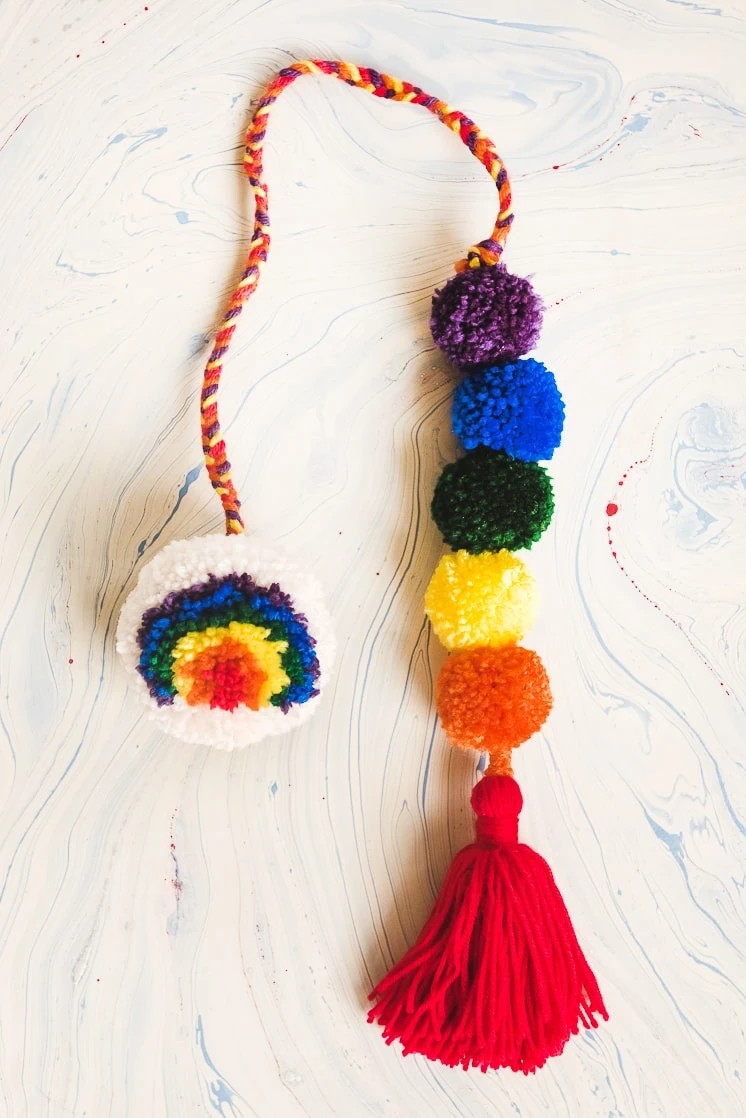
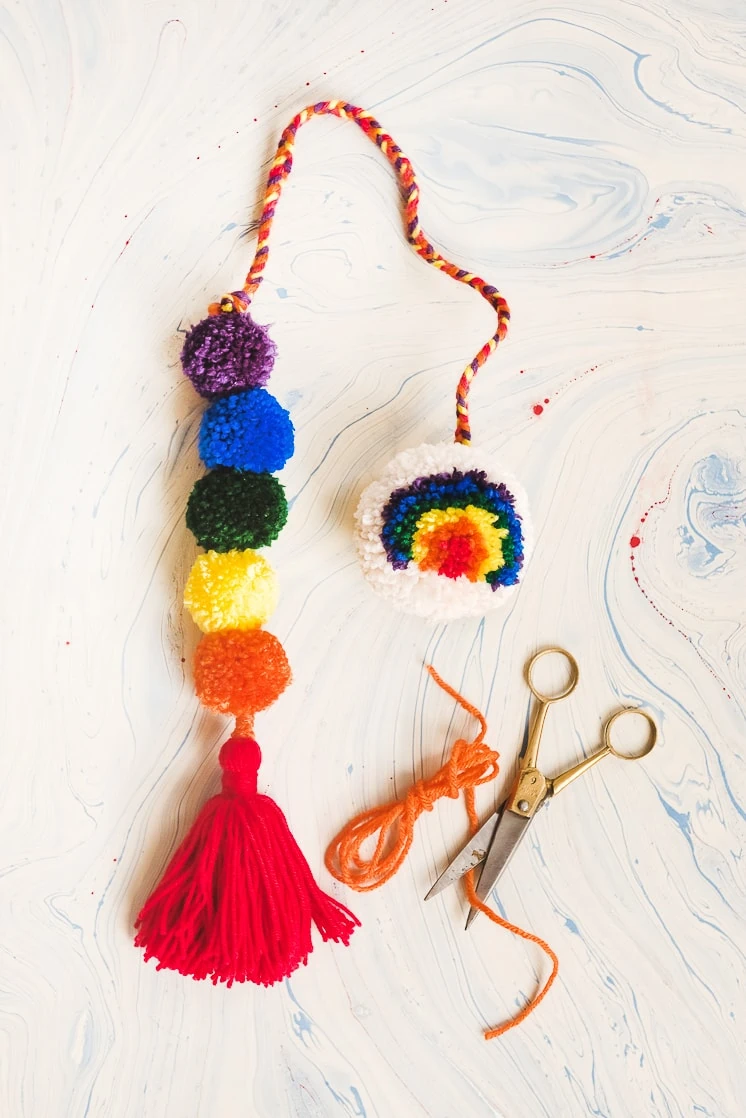
St. Patrick’s Day means many things but around here it means EVEN MORE RAINBOWS than normal–and we already live in a rainbow-filled world. We’ve been spotting lots of motif-themed poms and thought it would be fun to try it out our own DIY rainbow pom. It’s just like normal pom-making but with some layering and cutting involved. It’s much simpler than you might expect! We added on some solid colored poms to create a tassel. Together they’d be great to hang on a bag to get your festive green in.
Rainbow Pom Tutorial
Materials:
- scissors
- one medium/large knitting loom
- one small knitting loom
- white yarn
- red yarn
- orange yarn
- yellow yarn
- green yarn
- blue yarn
- purple yarn
Steps:
Making the Rainbow Pom:
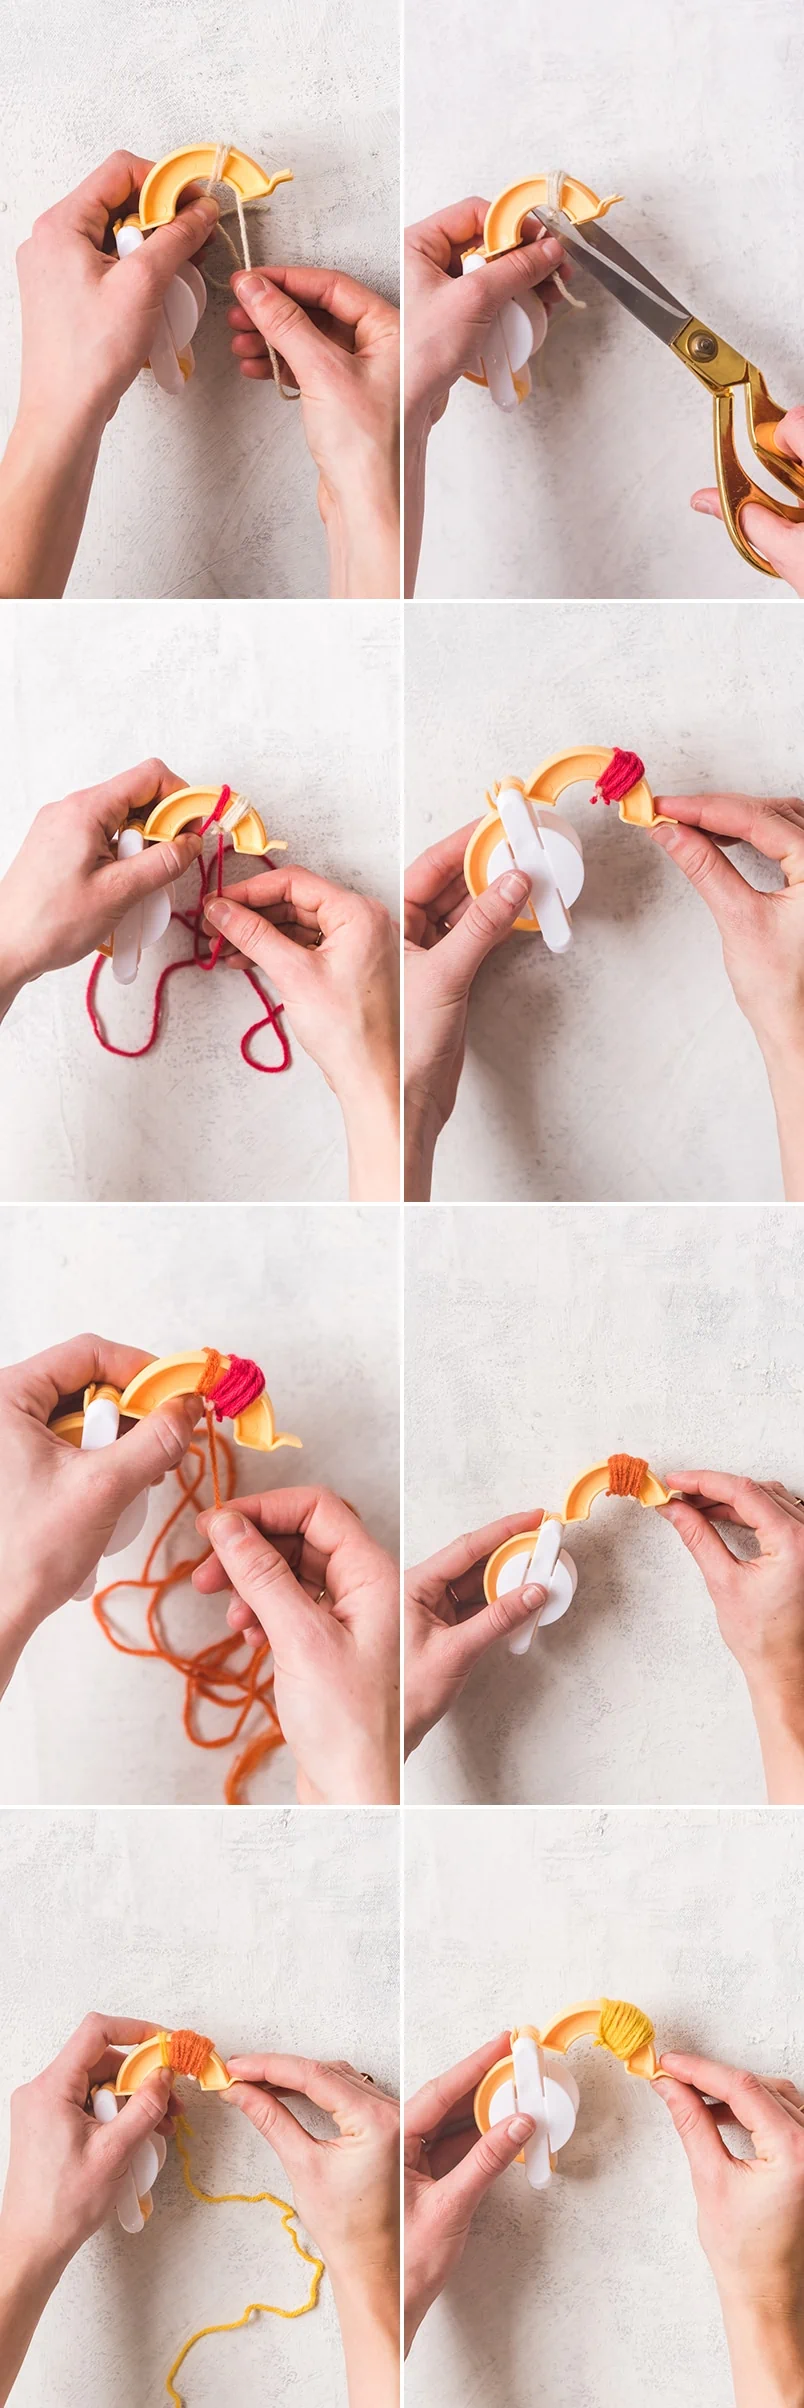
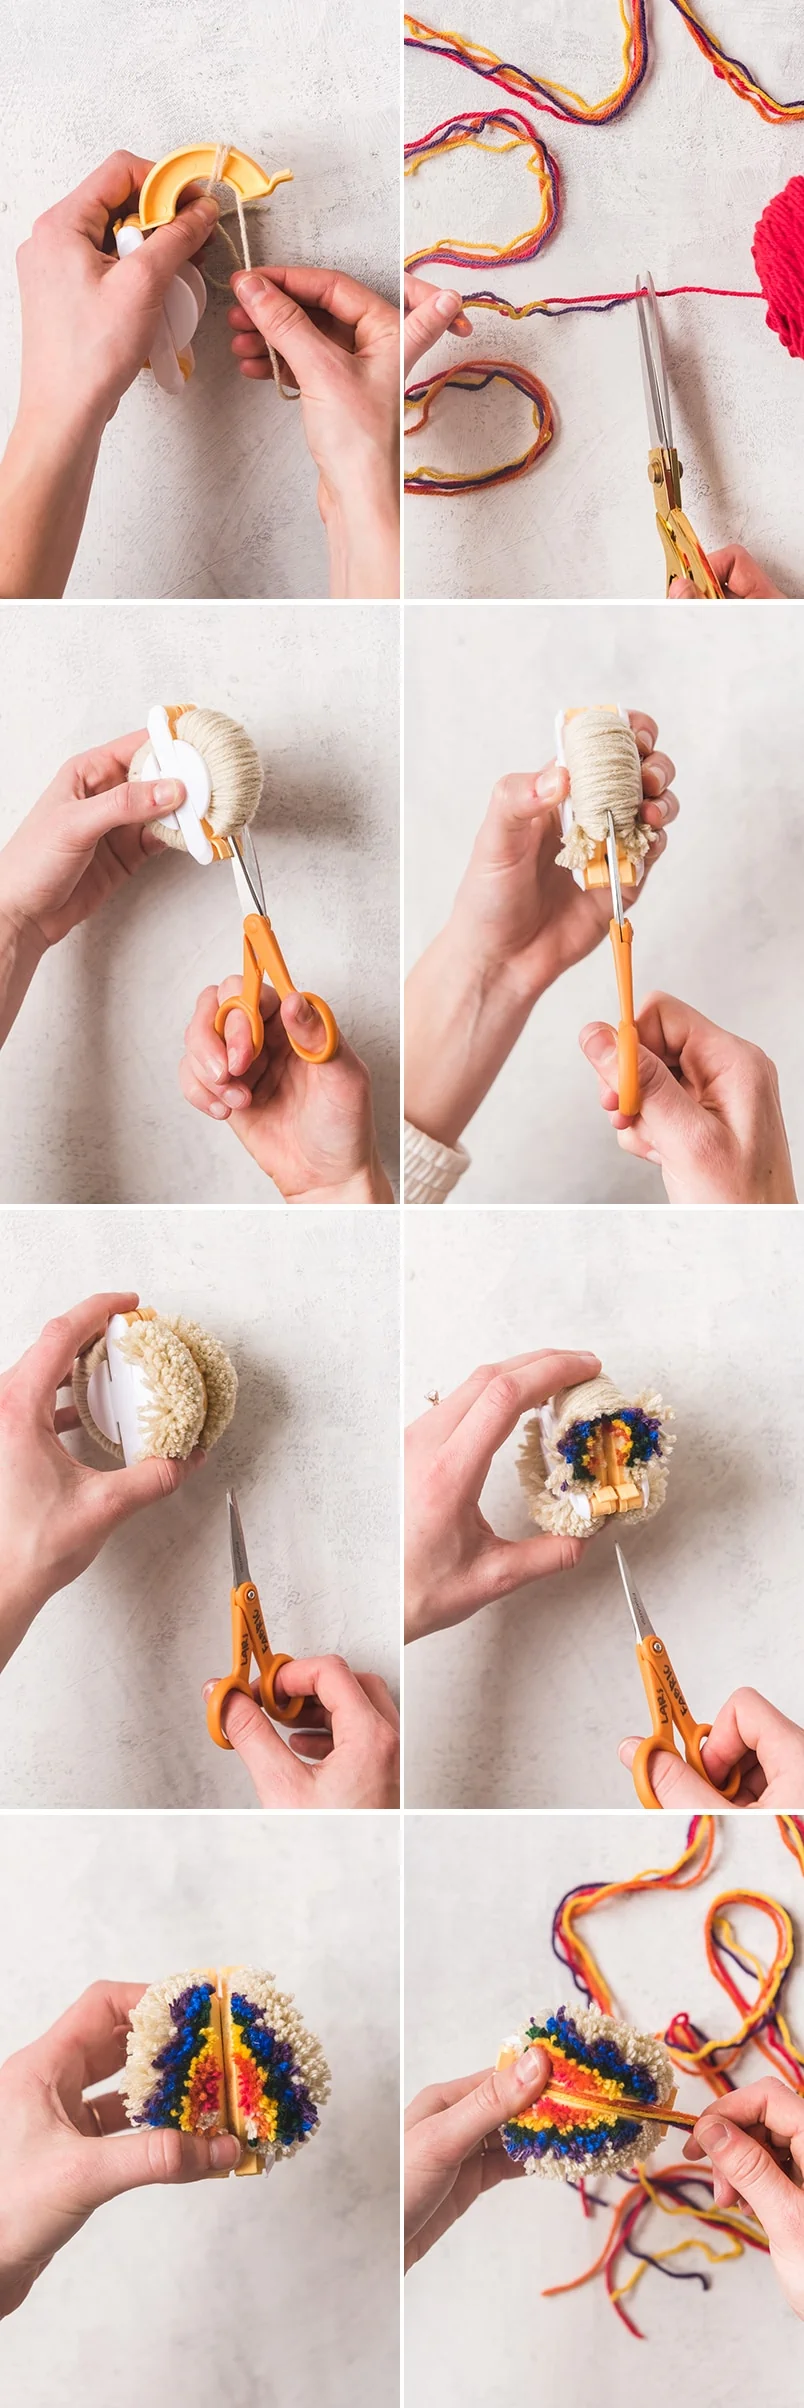
- Using your medium/large knitting loom, open one side of the knitting loom (the two side-by-side arches).
- Holding the two arches together, start by wrapping the WHITE yarn around the two arches just right of the center of the arch. When you begin wrapping the yarn, be sure to leave about an inch of the start of the yarn hanging down so that you are able to tie it to the end of the piece of yarn when finished wrapping.
- Wrap the white yarn about 10-15 times to the right of your starting point, covering the span of about one-third of an inch.
- Once wrapped enough, cut the end of the yarn and tie the beginning of the yarn to the end of yarn. Cut the excess strands after tying the knot.
- Next, using the RED yarn, start wrapping it about one-fourth of an inch to the left of where the white yarn started. Wrap the red yarn so that it covers the gap between where the white yarn starts, and continue to wrap until the red yarn completely covers the white yarn that you previously wrapped.** Once the white yarn is covered by the red yarn, cut the end of the red yarn, and tie the it to the beginning of the red yarn. Cut the excess pieces.
**TIP: Be sure to stop wrapping the red yarn where the white yarn ends. This will help in creating a more precise rainbow shape on your pom.
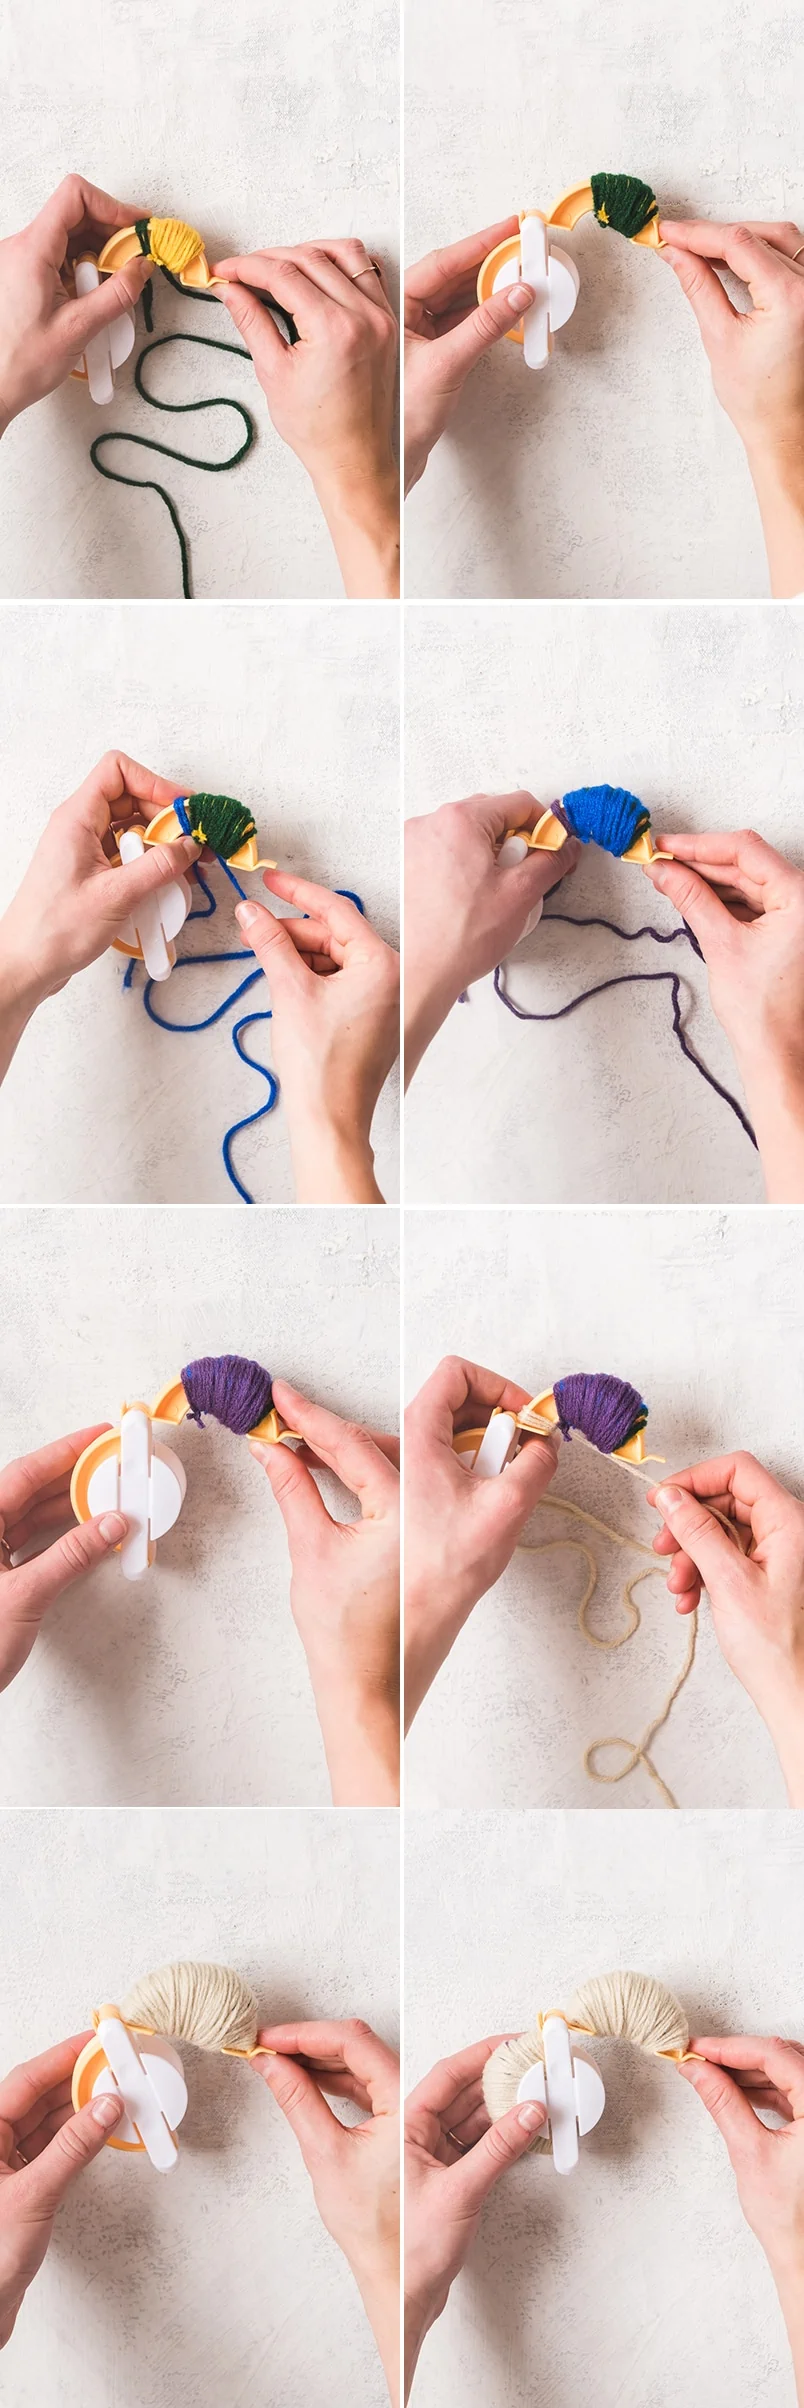
- You will repeat step #5 for every other color being used for the rainbow–– orange, then yellow, then green, then blue, then purple. Be sure to begin wrapping each new color of yarn just to the left of where you began wrapping the previous color. Also, be sure that each new color that you wrap covers each of the previous colors that you wrapped. Each new color of yarn should end at the same spot.
- Once you have finished wrapping and tying the last color being used for the rainbow (purple), you will use the WHITE yarn once again. Wrap the white yarn to completely cover the arch of the knitting loom all the way from left to right, so that the only color you will be able to see is white.** Tie the two ends of the white yarn together, and cut off any excess yarn.
**TIP: The arch will be more dense in the center where all of the rainbow yarn colors have already been wrapped. So be sure that when wrapping the white yarn, that the arch is evenly dense from left to right. This means that you will have to wrap the white yarn around the very left side and very right side of the arch a lot more than you will in the middle of the arch. The white yarn should be dense enough that when you close the wrapped side of the knitting loom that it feels tight when closing.
- You have now finished the front half of the rainbow pom. Close the side that you just wrapped and open the other side of the knitting loom. This side will be wrapped by only the WHITE yarn.
- Start by wrapping the white yarn at one end of the arch and work your way all the way to the other side. This will require a lot of wrapping. You will want this side of wrapping to match the density of the other side with the rainbow pattern.
- Once you have tied the two ends of the white yarn together and cut off the excess, close this side of the knitting loom.
- Set the knitting loom aside, and cut 4 feet of 4 different colors of yarn (we used yellow, orange, red, and purple). This group of yarn will be used to tie around the pom to hold it together.
- Now, back to the knitting loom, with both sides closed to create a circle, you will start on one side and cut down the middle of the two arches. Be sure that every strand of yarn is cut.
- Next, cut down the middle of the two arches on the other side of the knitting loom.
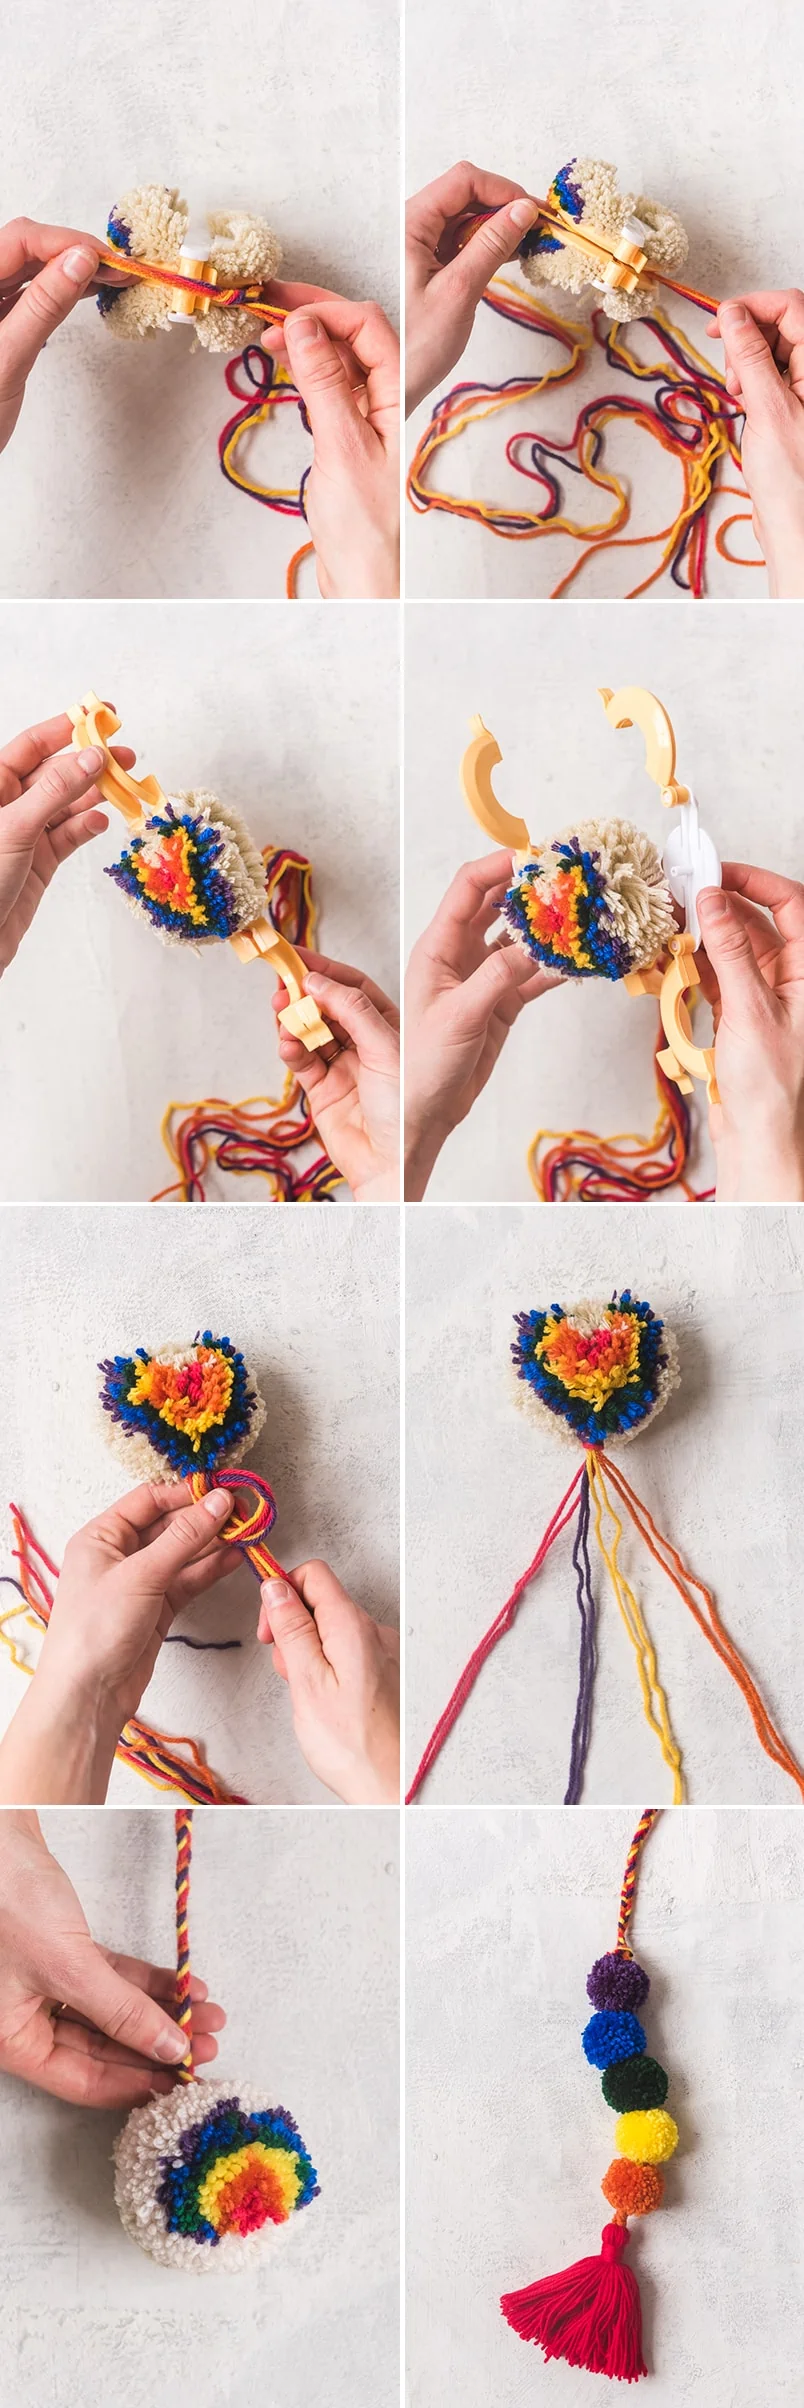
- Holding the knitting loom together to be sure that is does not open, take the 4 feet of 4 different colors of yarn that you previously cut and wrap it completely around the knitting loom–– down the center of the arches where you just cut the yarn. Tie a tight DOUBLE knot around the pom. Be sure to tie your knot at the top of the pom so that the rainbow pattern will be facing forward.
- Once the double knot is tied, remove the knitting loom completely off the pom.
- You may want to trim the pom so that it is more spherical.
- The next step is braiding the 4 feet of yarn at the end of the pom. There will be two strands of each color, so 8 total strands of yarn. Group the same colors together, so that you essentially have 4 strands of yarn. Fish tail braid the yarn until it reaches about 1.5–2 feet based on your own preference of how long you want your poms to hang.
- Tie a knot where you end your braid. Do not cut off the excess strands, because they will be used in our next step!
Making and Connecting the Smaller Poms:
- Using your smaller knitting loom and PURPLE yarn, create a small single colored pom. Wrap one of side on the knitting loom in all purple, and tie the ends together and cut off the excess. Close this side of the knitting loom.
- Open the other side of the knitting loom and wrap it completely in purple yarn. Tie the ends of the yarn together and cut off the excess. Close this side of the knitting loom.
- Cut the yarn down the middle of both sides of the knitting loom.
- You will now use the excess strands from the fish tail braid to wrap around the small purple pom. Wrap half of the strands around one side, and the other half of strands around the other side, tying a TIGHT DOUBLE knot around the pom where all of the strands meet.
- Remove the knitting loom from the pom.
- Trim the pom so that it is more spherical.
- You should now have the large rainbow pom attached to the small purple pom by the braided yarn, still leaving the excess 8 strands hanging from the purple pom for later use.
- You will now create another small pom using the BLUE yarn.
- Repeat steps #19–20 with the blue yarn.
- Once you have cut the yarn down the middle of both sides of the knitting loom, cut about a 1 foot long piece of blue yarn. Wrap the piece of blue yarn around the middle of the knitting loom and tie a double knot on one end of the pom.
- Cut another 1 foot piece of blue yarn and wrap it around the knitting loom so that you end up tying a double knot on the side exact opposite from the previous double knot that you tied. Leave the excess strands for later use.
- Remove the knitting loom from the pom and trim the pom so that it is more spherical.
- You will be creating 3 more small poms–– a green, yellow, and orange pom.
- Repeat steps #26-30 to make each of these 3 small poms, using the green, yellow, and then orange yarn.
- Now that you have completed each of the small poms, 5 in total, you will attach each of them together.
- Start by attaching the small blue pom to the small purple pom. Take the excess strands hanging from the purple pom and tie them to one side of the strands from the blue pom. DOUBLE KNOT.
- Now, attach the green pom to the bottom of the blue pom. Take the two strands hanging from the blue pom (the ones that were not used to connect the blue pom to the purple pom) and tie them to one side of the strands from the green pom. DOUBLE KNOT.
- To attach the yellow pom to the bottom of the green pom, take the two strands hanging from the green pom (the ones that were not used to connect the green pom to the blue pom) and tie them to one side of the strands from the yellow pom. DOUBLE KNOW.
- To attach the orange pom to the bottom of the yellow pom, take the two strands hanging from the yellow pom (the ones that were not used to connect the yellow pom to the green pom) and tie them to one side of the strands from the orange pom. DOUBLE KNOT.
- The remaining strands from the bottom of the small orange pom will be used to attach the red tassel.
Making and Connecting the Red Tassel:
- Using a board, piece of wood, book, etc. that is about 5-6 inches in length, wrap the RED yarn around the board until the desired thickness of your tassel is reached. Cut the end of the yarn.
- Cut a piece of red yarn that is about 1 foot in length. Run the piece of red yarn under all the yarn that you just wrapped, and tie a tight double knot around the top of the wrapped red yarn.
- Remove the wrapped yarn from the board that you used.
- Wrap more red yarn horizontally around the tassel, about one inch below the top of the tassel. Leave some excess yarn when you begin wrapping so that you can tie it to the end of the yarn when you finish wrapping.
- Wrap the yarn around the tassel to your desired thickness and density.
- Cut the end of the piece of yarn, and tie the end of the yarn to beginning in a double knot.
- Then, at the bottom of the tassel, cut the yarn so that it is no longer connected.
- Trim the end of the tassel to your desired length and be sure that it is straight and uniform.
- Once your tassel is perfected, take the red strands of yarn at the top of the tassel and tie them to the strands still hanging from the bottom of the small orange pom. DOUBLE KNOT.
- Finally, each pom and tassel is connected. You can know cut all the excess strands of string. Be sure not to cut through any of the knots holding the poms and tassel together.
- Trim any remaining imperfections or unsmooth areas.
If you make it, we’d love to see it. Tag us with #LarsMakes or #CraftTheRainbow !


Comments