Welcome to this week’s edition of our Sewing Basics series! This week we’ll be learning how to read a pattern.
We know that many of you are already familiar with the sewing basics, but we also know that many of you have a lot you would like to learn. In order to bring everyone up to speed, we’ve decided to help you out with some essential sewing skills that will help you succeed at a wide variety of basic sewing projects.
This Sewing Basics series is designed to give you the basic skills you need to get sewing! It’s for sewing projects you’ve wanted to make but have been a bit intimidated by until now. For those who’ve already learned the basics at some point, it’s a great refresher. For those who are completely new to sewing, it’s the perfect place to start.
For past Sewing Basics posts, click here.
How to Read a Pattern
Reading a pattern can be confusing, especially if you’ve never seen one before. What do all those markings mean? It’s easy to feel overwhelmed and not know where to start. Our goal today is to teach you all you need to know about reading a pattern so you can successfully use them for your sewing projects!
Basic Terminology
First things first: some basic terminology. In order to successfully tackle any pattern, you need to know some basic terminology, including the symbols that show up on your patterns. Most patterns will have a guide somewhere that has a key, telling you what each symbol means for that specific pattern. Use the guide provided by the pattern, and consult the following list if you’re still confused.
The following terms are the essentials–almost every pattern has these, so you’ll need to know what they mean and what to do with them:
Notches
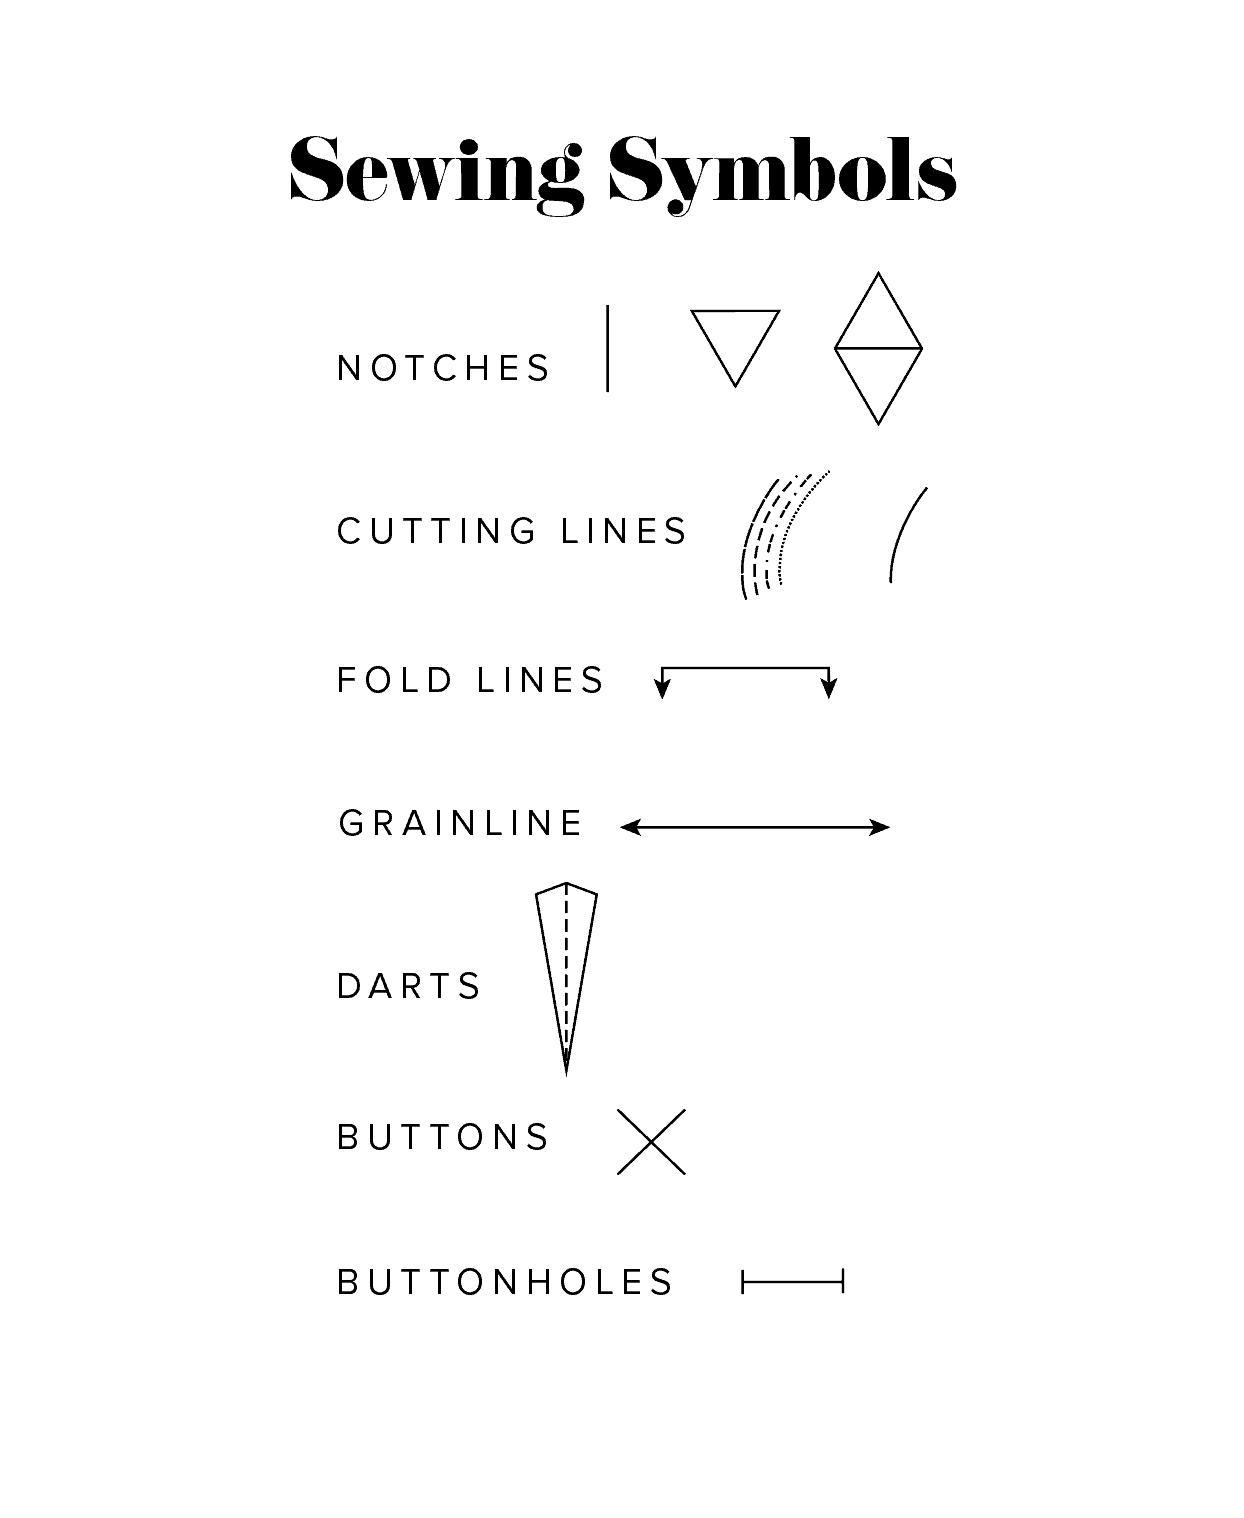
Notches are little ticks or marks that show up periodically along the edge of your pattern pieces. Traditionally, they’re the shape of a little triangle or diamond (Vogue, Butterick, and McCall’s patterns are all standardized and triangle/diamond-shaped), but they can also show up in the form of simple lines. Pattern makers put notches on patterns so the pattern pieces can be lined up and sewn correctly. What to do with them: You can either cut the little triangle completely out, or snip down to the point. If there’s a simple line instead of a triangle, just snip on top of the little line about ¼” in.
Cutting lines
These are the lines you’ll follow to cut out your correct size. In traditional, non-digital patterns, the lines are all stacked next to each other. Each different size will have a different patterned line so you can differentiate between the lines (dotted, dashed, etc). In more contemporary, digital patterns, it’s also common to have the option to click off the extra sizes. That way you just have your size selected (see this post on how to do this!). What to do with your cutting lines: cut out each pattern piece along the cutting lines!
Fold Lines
These lines tell you when a part of your pattern piece should be cut out on the fold. They’re basically lines with arrows on each end that point to the line that should be placed along the fold. What to do with them: simply line up the fold line edge of your pattern piece so it’s on a fold, rather than cutting along that edge.
Grainline
The grainline is very important. It’s a long, straight line in the middle of your pattern piece with an arrow at each end. This double-sided arrow tells you what direction your pattern piece needs to face on the fabric. Line it up incorrectly and you end up with wonky pattern pieces that don’t hang right. What to do with it: To line it up correctly, make sure the arrow is parallel to the selvedge (the white, non-fraying border along the edge of the fabric. The selvedge usually has words printed on it, so even if your fabric is white, you should be able to tell where it is.)
Darts
Another important symbol to know are darts. These are also triangle and diamond shaped, like notches, but much bigger. Darts are used to shape the fabric and fit it to your body more closely. What to do with them: mark all the dart points with pins, fabric marker, or chalk, then follow the pattern’s instructions to sew them correctly.
Buttons
Next on our list: buttons. These are little X’s, and they mark where the buttons go. What to do with them: simply mark them with pins or fabric markers, then follow the pattern’s instructions to sew the buttons on.
Buttonholes
Like buttons, the buttonhole markings simply show where to put the buttonholes. Their symbol is a little line with one perpendicular line at each end (kind of like a capital i). What to do with them: mark them with pins or fabric markers, then follow the pattern’s instructions to sew them.
Other Important Notes About How to Read a Pattern
Before we send you off to tackle reading a pattern on your own, remember to read the pattern’s instructions! This is at the top of the priority list, since most of your questions will probably be answered as you read each pattern’s instructions. Things that should be included in your pattern’s instructions are:
Default seam allowance
This will tell you if you should have a ½”, ¼”, ⅝”, or some other seam allowance. This makes a big difference in how well the clothing item you’ve chosen will fit! Sew with a seam allowance that’s too big and your beloved shirt will be too tight. Sew with a smaller seam allowance than indicated and it will be bigger than you want it.
Notions
These are the extras you’ll need for your sewing project. This includes buttons, thread, elastic, zippers, snaps, drawstring, etc. Basically anything that’s not your actual fabric! The pattern instructions will indicate how much of each thing to get and what size, so you’ll definitely want to consult this list before buying your supplies.
Size charts and fabric yardage
Size charts are absolutely essential! They tell you what pattern size is right for your body (or whoever you’re making the clothes for), and how much fabric you’ll need for that size. Definitely consult this before just guessing what size will be correct, as many patterns sizes and measurements vary.
Our Favorite Patterns
Now that you’re an expert on reading patterns, it’s time to get going! Here are some of our favorite pattern companies (for discount codes, click here):
Friday Pattern Company
One of our favorite pattern companies is Friday Pattern Company. They have so many cute options! Their patterns are also very detailed and the instructions are clear. They’re a great option for beginners.
Birgitta Helmersson
Another wonderful source for patterns, especially if you’re looking to be more eco-friendly in your sewing, is Birgitta Helmersson. Her patterns are waste free, which means you don’t have to print out a pattern at all! Instead, she has detailed instructions and diagrams for how to cut and assemble your pattern pieces.
Merchant and Mills
We also love Merchant and Mills! Based in Great Britain, their patterns are classic and timeless. We’re obsessed!
Obviously, this list of pattern companies is far from extensive. If you have pattern companies you love, let us know in the comments! And please, any questions or comments about how to read a pattern, just drop them below.
More Inspiration
Did you love this post on how to read a pattern? There’s more where that came from! Check out the rest of our Sewing Basics series here. You won’t want to miss these cute DIY pencil cases, either! Also, see our past sewing projects: New Team Outfits, Easter outfits, Casetify inspired projects, shaped throw pillows, Mother’s Day apron, quilted shower curtain, quilted face mask, rainbow buttons, reusable lunch sack, and DIY beeswax wraps.


Comments