Welcome to week six of our Sewing Basics series!
We know that many of you are already familiar with the sewing basics, but we also know that many of you have a lot you would like to learn. In order to bring everyone up to speed, we’ve decided to help you out with some essential sewing skills that will help you succeed at a wide variety of basic sewing projects.
This Sewing Basics series is designed to give you the basic skills you need to get sewing! It’s for sewing projects you’ve wanted to make but have been a bit intimidated by until now. For those who’ve already learned the basics at some point, it’s a great refresher. For those who are completely new to sewing, it’s the perfect place to start.
This week we’ll be teaching you how to clean your sewing machine. Let’s go!
Materials:
Why Clean Your Sewing Machine?
With all those sewing projects you’ve probably been working on now, chances are your sewing machine could use a little TLC. It’s crazy how quickly the lint builds up in a sewing machine! Did you know it’s standard to clean your sewing machine pretty frequently? (If not, no shame. I only learned how to clean a sewing machine this year, so you’re not alone). Though your sewing machine will probably do okay even when it’s a little dirty, it can lengthen the lifespan of your sewing machine quite a lot to follow these simple steps to cleaning it every now and then. Upkeep like this will make sure your sewing machine stays in pristine condition so you can sew to your heart’s content for years and years.
How to Clean your Sewing Machine
Happily, cleaning your sewing machine is simple, not to mention quick, as long as you do it consistently. As with our other tutorials, we’ll be using a Singer Heavy Duty machine. While that may not look exactly the same as your machine, the basic principles still apply. Here’s what to do:
Prepping your Machine for Cleaning
- First, remove the thread spool and bobbin thread spool from your machine and set them aside. Note: you’ll be removing a lot of small parts during this process. Make sure you’re careful not to lose them or knock them onto the floor! If it helps, you can store them in a small bowl or ziplock bag so they’re safe in one place.
- Now, remove the presser foot by pressing the lever behind the presser foot.
- If desired, you can also remove the needle so it doesn’t poke you during the cleaning process.
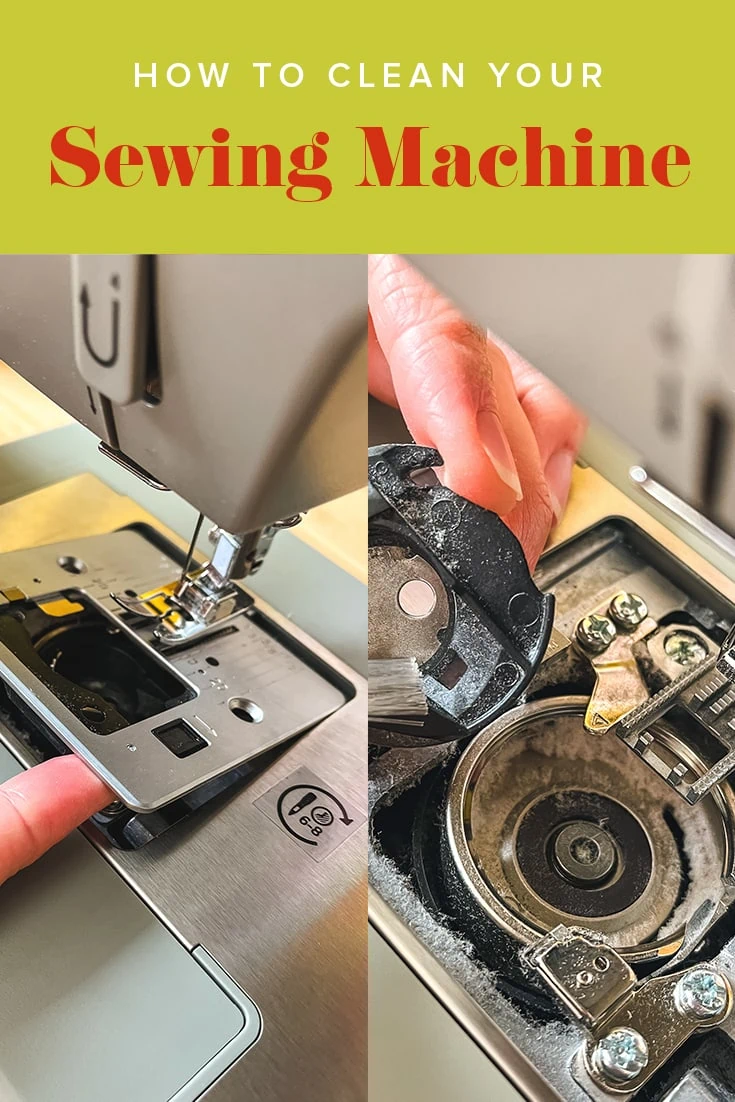
- Next, use the small metal screwdriver tool to remove the needle plate (this is the metal plate that surrounds the feed dog, directly below the presser foot. Put the plate and screws into the ziplock bag or bowl for safekeeping.
- Once you’ve removed the feed dog plate, you’ll see two screws and a metal arm holding the bobbin case in place (if your bobbin loads into the top). Without pulling the screws completely out, loosen them enough to remove the bobbin case.
- You’re ready to start cleaning!
Cleaning your Machine
- Starting from the outside moving in, use the mini brush (this accessory should come with your sewing machine) to clean in the cracks and crevices. Use a simple, dry cloth to wipe dust off the larger areas of the front, sides and back of the machine.
- Once you’re done with the exposed areas of the machine, you can move into the area underneath the needle plate.
- For this, use the mini brush and work your way around the nooks and crannies, removing lint as you go. Be careful not to blow into those areas (it’s tempting, I know!) because it will push the lint further in. Just gently work your way around with the brush, and cloth when needed, until all the lint is gone.
- Remember to clean off the parts you removed, as well, like the needle plate and bobbin case, before putting them back into your freshly cleaned machine.
Putting your Machine Back Together
- First, put the bobbin case back in place and tighten the screws you loosened.
- Next, put the needle plate back on and screw it into place.
- Now you can put the needle, presser foot, thread spool and bobbin thread spool back into the machine.
- Done!
How did cleaning your machine go? Let us know in the comments!
Past Sewing Basics Posts
For more in our Sewing Basics series, see For past weeks of our Sewing Basics series, see how to thread a sewing machine, how to choose the right fabric, how to sew mitered corners, buttons and buttonholes, and basic stitches.
More Inspiration
We hope you’ve enjoyed this tutorial on how to clean your sewing machine. Now that you’ve completed the first six weeks, you should be fully equipped to make any sewing project on our blog! For things to wear, try our new team outfits, Mother’s Day apron, Easter outfits, quilted face mask, quilted sleeping mask, quilted coat, and Funky Town projects. Looking for home decor options you can sew yourself? You’ll love these Shaped throw pillows or our Celtic knot pillow. Also, here’s our quilted shower curtain.
Need a new bag? See our Lemon Tote bag and duffel bag picnic tote. Don’t forget about our Reusable lunch sack and DIY beeswax wrap for back to school, while you’re at it! Speaking of kids, have a baby at home? Try this adorable mushroom playmat, baby bonnet, bunny bonnet, and stuffed Easter bunny.
Want to make clothes but need a pattern? Try Friday Pattern Company or Birgitta Helmersson (click here for discount codes for both!)
But don’t worry, we’re not done sewing yet. We’ll keep our series going with more tips and tricks to take your sewing projects to the next level, so stay tuned!


